Install spiral duct by working a fixed sequence: verify layout and material, set supports to the shop drawing, lift and seat each section to the stop-fold limiter, fasten with the correct screw pattern, seal, then test. Acceptance hinges on three things: runs level and axially aligned, joints sealed to the specified leakage class, and hangers spaced per engineering, not guesswork.
Before the crew picks up a saw, run this:
- Confirm tags, diameters, and gauge match the shop drawing.
- Check gaskets are present and undamaged on every fitting.
- Mark hanger and threaded rod locations before drilling.
- Stage sections in run order to avoid double-handling.
- Verify self-drilling screws, rivets, and mastic are on the cart.
- Confirm test port locations with the commissioning plan.
- Check for interferences with electrical, sprinkler, or cable tray.
- Keep end caps on until the moment of assembly.
Reference SMACNA duct construction standards and EN 12237 airtightness classes when a question comes up mid-install. Spiral duct also uses roughly 30% less raw material than an equivalent rectangular run for the same airflow, which is part of why it goes up faster once the supports are right.
Key Takeaways
A spiral duct run passes inspection when supports follow the shop drawing exactly, joints are seated and sealed after fastening, and airtightness testing follows SMACNA or EN procedure on a representative section.
| Point | Details |
|---|---|
| Follow the fixed sequence | Layout, supports, lift and seat, fasten, seal, then test, in that order every time. |
| Never eyeball hanger spacing | Use the shop drawing’s engineered interval and document any field deviation with sign-off. |
| Seal after fastening, not before | Clean mating surfaces with solvent, then apply mastic or tape once screws are torqued. |
| Fasten in crosswise order | A star pattern around the joint keeps it round and seats the gasket evenly. |
| Manara Corp preps joints in-shop | Pre-fit and tagged sections from Manara Corp’s Lachine shop cut field rework on Montreal-area installs. |
Table of Contents
- How do you install spiral duct step by step?
- How do you choose the right diameter, gauge, and pressure class?
- What’s the correct hanger spacing for spiral duct?
- How do you cut and join spiral duct fittings correctly?
- What’s the best way to seal spiral duct joints?
- Do spiral ducts need insulation, and what about fire code?
- How do you commission and test a spiral duct run?
- What tools and fasteners should be staged on the truck?
- Why do spiral duct joints leak, sag, or fail inspection?
- How does shop fabrication speed up field installation?
- How Manara Corp supports your spiral duct project
- Sources
- FAQ
How do you install spiral duct step by step?
The sequence below is what separates a run that passes airtightness testing on the first try from one that gets reopened three times. Skip a step and you’ll find out at the worst possible moment, usually when the test rig is already pressurized.
1. Verify layout and material before touching a tool
Walk the run against the shop drawing before anything gets lifted. Confirm diameters, gauge, and fitting locations match what’s tagged on each crate. Check gaskets are seated and undamaged, and check for shipping deformation on cut ends. A dented spigot end will never seat properly against a stop-fold limiter, and finding that out after the run is half assembled costs you an hour you don’t get back.
2. Set supports before you lift a single section
Mark threaded rod locations against the shop drawing, not by eye. Confirm the structure above can actually take the load, and flag interferences with sprinkler lines, cable tray, or lighting before you drill. Setting hangers first, then threading duct through them as you go, is faster than lifting a full run and trying to support it afterward.
3. Lift, seat, and align each section
Raise each section to the hanger, seat the male end into the female end until it stops against the factory stop-fold limiter, and give it a slight rotation as you seat it. That rotation trick settles the gasket evenly around the circumference instead of bunching it on one side, which is one of the most common causes of a leaky joint that otherwise looks fine. Inspect the gasket face just before insertion. A speck of grit or a nick in the rubber is invisible once the joint is closed but shows up immediately on a pressure test.
4. Fasten in the right pattern
Drive self-drilling screws or rivets evenly around the joint circumference, tightening in a crosswise, star pattern rather than working around the ring in sequence. A crosswise order seats the gasket uniformly; a sequential order can walk the joint slightly out of round on larger diameters. Manufacturers commonly recommend screws spaced at regular intervals around the joint, tightening every screw before moving to the next joint down the run.
5. Seal after mechanical fastening, not before
Apply mastic or metal-backed tape once every fastener is in and the joint is mechanically sound. Sealing a loose joint just traps the leak path under a layer of mastic that will crack the first time the duct flexes under pressure. Wipe the mating surfaces with an appropriate solvent first. Factory oils left on the metal are an invisible cause of sealant failure months down the line, and it’s a thirty-second step that gets skipped more than any other.
6. Build in intermediate checkpoints
Don’t wait until the whole floor is complete to find out a joint leaks. Cap runs temporarily at the end of each day and do a visual walkthrough of every joint before you leave. Catching a mis-seated gasket on day two is a five-minute fix. Catching it during final commissioning after the ceiling grid is in means cutting insulation, pulling a hanger, and explaining the delay to the GC.
- Verify layout, diameters, and gasket condition against shop drawings.
- Mark and set all hangers before lifting duct.
- Lift, seat to stop-fold limiter, rotate slightly, and inspect the gasket.
- Fasten with screws or rivets in crosswise order.
- Seal joints with mastic or tape after fastening.
- Cap and visually check runs at intermediate points before final test.
Pro Tip: Before you close a joint for good, shine a light through the open end and look for daylight around the seam. It takes ten seconds and catches a poorly seated joint before it’s buried behind insulation.
How do you choose the right diameter, gauge, and pressure class?
Start with airflow, not the other way around. Calculate required CFM, pick a target velocity for the application, and size the nominal diameter from there, rounding up to the nearest standard series diameter rather than splitting the difference. Undersizing to save a size on material cost almost always costs more later in fan energy and noise complaints.
Once diameter is set, cross-check it against the worst-case negative pressure the system will see. Spiral duct resists collapse well because of the lockseam’s inherent rigidity, but that resistance has limits, and exceeding them on a long return run is how you end up with an oval-shaped duct where a round one used to be.
Material and coating follow the airstream. Standard G90 or G60 galvanized steel covers the overwhelming majority of comfort HVAC applications. Kitchen exhaust, pool mechanical rooms, or anything handling corrosive or high-humidity air calls for 304 or 316 stainless. Mixing up that choice on a humid exhaust run is a warranty call waiting to happen.
Gauge selection isn’t a single number; it’s a relationship between diameter, pressure class, and span. Thin-gauge duct on a long unsupported run or in an abrasive exhaust application will oil-can or wear through faster than the spec sheet suggests. Bump gauge up a step whenever spans run long or the service is abrasive.
Leakage class is the number that decides whether the run passes inspection. SMACNA Class 3 or EN Class C and D leakage targets both depend heavily on transverse joint quality and gasket condition, not just sealant application. A perfectly caulked joint over a mis-seated gasket will still fail.
Run this checklist before an order goes out:
- Nominal diameter confirmed against airflow calculation.
- Gauge matched to diameter, pressure class, and span length.
- Pressure class specified for both positive and negative conditions.
- Leakage class target stated explicitly on the order.
- Fittings list cross-checked against the fittings catalogue for elbows, reducers, and tapers.
What’s the correct hanger spacing for spiral duct?
Spacing isn’t a rule of thumb you eyeball on-site. It’s an engineering input tied to duct weight, diameter, and pressure class, and changing it for convenience without sign-off risks sag, twist, or a joint that pulls apart under negative pressure.
Split clips work well for lighter, smaller-diameter runs where quick installation matters more than heavy load capacity. Suspension clips paired with individual hangers handle larger diameters and heavier gauge duct, and they’re easier to adjust for level once the run is loaded. Industry practice commonly places hangers at roughly every three metres on standard runs, though shop drawings can call for tighter spacing near fittings, transitions, or heavy accessories like dampers.
Threaded rod size scales with duct diameter and load. M8 rod is common for smaller, lighter runs; larger diameters or longer spans call for M10 or heavier. Whenever rod gets field-cut, touch up the cut thread with a cold galvanizing compound or equivalent anti-corrosion coating. A bare cut thread is the first place rust starts, and it’s the cheapest five-second fix on the truck.
| Duct diameter range | Typical hanger type | Typical rod size |
|---|---|---|
| Up to 12 inches | Split clip | M8 |
| 14–24 inches | Suspension clip + hanger | M8–M10 |
| — | Suspension clip + hanger, engineer-specified spacing | M10 or larger |
Level each run using the adjustable nuts on the threaded rod, not by shimming the duct itself. Check alignment with a spirit level at multiple points along the run, especially on either side of a bend or reducer, since a fitting can pull a run slightly out of true even when the straight sections read level.
Pro Tip: If a ceiling obstruction forces you off the shop drawing’s hanger spacing, get the change documented and signed off before proceeding. A field note today is a lot cheaper than an engineer’s call after the drywall is up.
How do you cut and join spiral duct fittings correctly?
Cutting is where a lot of avoidable rework starts. Use a dedicated pipe saw with a rotating support roller rather than a handheld grinder or reciprocating saw. The rotating support keeps the pipe true while the blade travels around it, producing a cut that’s square to the axis instead of the slight taper a handheld tool tends to leave. Deburr immediately after every cut. A burr left on the edge will shred a gasket the first time the joint is seated.
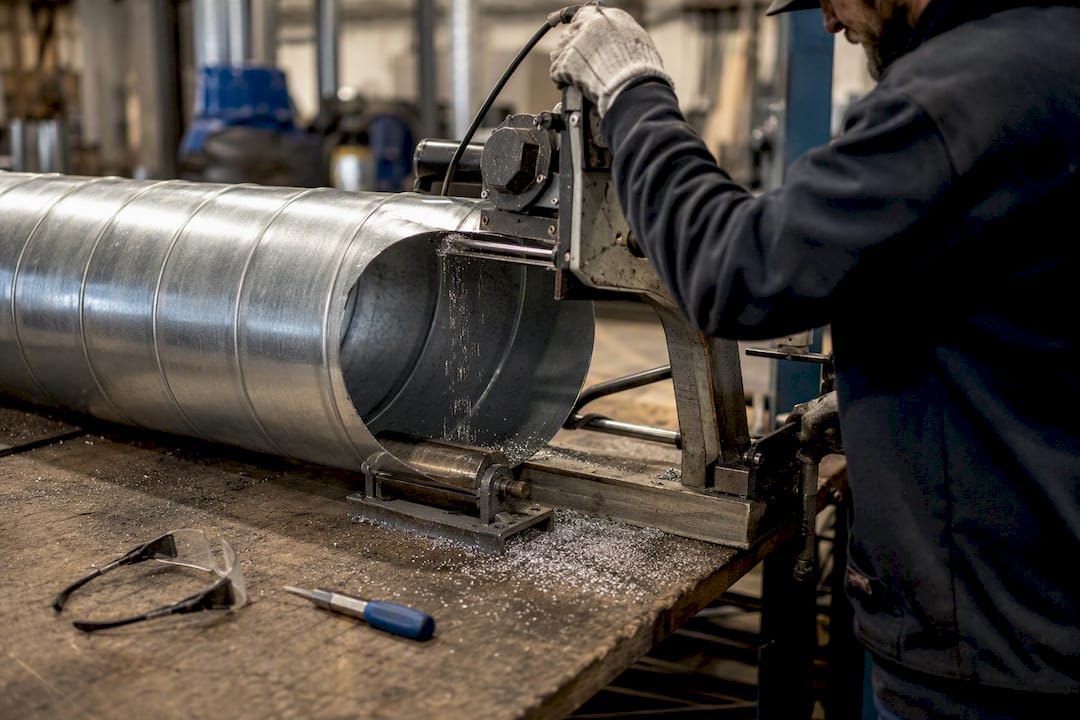
After cutting, check the cut end for roundness before it goes anywhere near a joint. Press a straightedge or a factory-cut coupling against the opening. If it doesn’t seat flush all the way around, the section has been pinched or bent during handling and should be rejected or re-cut rather than forced into place.
For assembly:
- Inspect the gasket on the female end for damage or debris.
- Insert the male end and push to full seating depth against the stop-fold limiter.
- Rotate the section slightly while seating to settle the gasket evenly.
- Confirm seating depth visually or with a witness mark from the factory.
- Fasten screws or rivets in crosswise order around the joint.
- Slip joints are the fastest field method and cover the majority of standard runs.
- Flange-to-flange connections suit higher pressure systems, outdoor exposure, or joints that need frequent access for maintenance.
- Vanstone connections are worth specifying anywhere a joint will be opened repeatedly for cleaning or inspection.
- Reducers, concentric or eccentric, need the same seating and screw pattern as straight couplings; don’t shortcut fastening because the fitting looks small.
- Elbows and tapers should be dry-fit before final fastening whenever the run has more than one directional change close together.
Picture the screw pattern as a clock face: four screws at 12, 3, 6, and 9 first, then fill in between at even intervals rather than working straight around from one point. That crosswise sequence is what keeps the joint round instead of pulling it oval.
What’s the best way to seal spiral duct joints?
Gasketed couplings, mastic, and self-sealing systems each suit different conditions, and picking the wrong one for the job is a common source of failed leakage tests. Factory gaskets alone handle most low and medium pressure comfort applications well, provided the joint is seated correctly and fasteners are tight. Mastic adds a second line of defence and is worth the extra labour on any run headed for a leakage test, on exposed ductwork, or anywhere access for repair later will be difficult. Metal-backed tape works as a fast alternative to mastic on accessible runs but tends to underperform mastic on rough or uneven seams.
Sealant goes on after mechanical fastening is complete, never before. Applying mastic to a joint before the screws are tight just means reworking the mastic once the fasteners pull the joint into final position. Manufacturers commonly recommend even screw spacing before sealant application, tightened in crosswise order, so the joint is fully seated when the sealant goes on.
The two failure modes that show up most often on a test day are contaminated mating surfaces and mis-seated gaskets. Both are avoidable with a thirty-second visual check before the joint closes.
Before running an airtightness test:
- Confirm every fastener is in and torqued, not just started.
- Wipe mating surfaces with solvent before sealing, removing factory oils.
- Isolate a representative test section that includes a realistic variety of fittings, not just straight runs.
- Confirm the test section meets the minimum surface area called for under EN 12237 and EN 14239 test procedures.
- Record ambient conditions and test pressure alongside the pass/fail result.
Trust signal: Airtightness classes under SMACNA and EN 12237 exist specifically because transverse joint quality, not straight duct wall, is what drives leakage rate on a finished system. A duct engineered to Class C or D leakage still fails if the joints aren’t seated and fastened to spec.
Do spiral ducts need insulation, and what about fire code?
Insulation on spiral round duct needs a clean, dry surface and an adhesive suited to the jacket material. Wrap insulation snugly around the curve of the duct rather than leaving gaps at the seam. A gap becomes a thermal bridge, and on cold supply air that means condensation forming exactly where you can’t see it until a ceiling tile stains.
Hanger contact points deserve their own attention. A bare metal hanger pressing directly into insulation compresses the material and creates a localized cold spot. Use a saddle or protective pad at every hanger location on insulated runs so the insulation keeps its full thickness where it matters most.
Code considerations matter more on spiral than installers sometimes assume. Grease duct applications typically require a different wall construction and joint type entirely; check the project’s fire strategy and local code before assuming standard spiral construction is acceptable for kitchen exhaust. Fire-rated penetrations through floors or fire separations need listed firestop systems rated for the specific duct material and diameter passing through, not a generic caulk bead.
Before an inspector walks the site, confirm:
- Insulation is continuous with no gaps at seams or hanger points.
- Hanger contact points have protective saddles on insulated runs.
- Fire-rated penetrations use a listed firestop system matched to the duct.
- Grease or high-temperature exhaust runs follow the project’s specific code requirements, not standard supply-air detailing.
How do you commission and test a spiral duct run?
Before pressurizing anything, confirm every fastener is torqued, every temporary end cap from staging is removed, and test ports are installed at the locations called for in the commissioning plan. A single leftover shipping cap left in a branch will throw off an entire test result and send the crew hunting for a leak that isn’t there.
Set up the test per EN guidance: isolate a section large enough to meet the minimum surface area requirement, and make sure that section includes a representative mix of fittings, not just straight run, so the result reflects real system performance. Record the test pressure, hold time, and measured leakage rate against the specified class.
If the test fails, work the leak hunt in order rather than guessing:
- Check transverse joints first; they account for most leakage in a properly fabricated run.
- Check longitudinal seams next, especially near any field-repaired damage.
- Inspect penetrations through walls, floors, or fire separations.
- Check access doors and their gaskets.
- Recheck gasket seating at every joint that showed a pressure drop nearby.
Hand over as-built markings showing any field deviations from the shop drawing, the recorded test results, and engineer sign-off documentation for any change to hanger spacing or fitting substitution made on-site.
What tools and fasteners should be staged on the truck?
A missing box of screws costs more in downtime than the screws are worth. Keep a standing kit stocked and restocked after every job rather than checking inventory the morning of.
- Spiral pipe saw with a rotating support roller for square, clean cuts.
- Drill drivers and a screw gun with torque control to avoid over-driving fasteners.
- Pop rivet gun for joints and fittings where rivets are specified over screws.
- Self-drilling screws and pop rivets stocked across the diameter range on the job.
- Spare gaskets sized for the fittings in use, plus mastic or metal-backed tape.
- Plastic end caps for staging cut sections and protecting interior cleanliness overnight.
- Rubber or foam pads for hanger contact points on insulated runs.
- A spirit level, tape measure, and a torque-checked screw gun for spot verification.
Why do spiral duct joints leak, sag, or fail inspection?
Most callbacks trace back to one of four repeat offenders. Knowing the pattern means you can catch it during assembly instead of during the test.
| Problem | Likely cause | Field fix |
|---|---|---|
| Leaky transverse joint | Mis-seated gasket or contaminated surface | Reseat gasket, clean surface, re-torque screws |
| Sagging run | Hanger spacing exceeds engineered interval | Add hanger per shop drawing, do not just tighten existing rods |
| Deformed cut end | Handheld cutting tool or rough handling | Re-cut with roller-supported pipe saw or reject the section |
| Joint pulls apart under pressure | Fasteners driven in sequence instead of crosswise | Remove and re-drive in crosswise star pattern |
A run that sags between two hangers almost always means someone widened the spacing to save a rod, not that the duct itself is defective. When a problem shows up repeatedly on the same fitting type, it’s often faster to call the fabrication shop back for a batch fix than to patch each one individually on-site.
Pro Tip: Walk every joint with a flashlight before you seal, not after. A joint that looks fine from three feet away often shows a gap the moment light hits it at an angle.
How does shop fabrication speed up field installation?
Manara Corp runs spiral duct jobs from RFQ through coil selection, CNC laser cutting or roll forming, pre-fit assembly, and tagging before anything leaves the shop. Sections arrive crated or racked, end-capped, and tagged to match the shop drawing, so field crews aren’t fabricating fittings on-site under a deadline.
- RFQ and coil selection matched to the project’s diameter, gauge, and pressure class.
- Laser cutting and roll forming for consistent, square cuts across every section.
- Pre-fit assembly and tagging so joints are verified before shipment, not discovered on-site.
- Crate and rack packing with end caps to protect interior cleanliness in transit.
The time savings shows up in critical joints sealed or pre-fit in the shop rather than in the field, and in a fit-check on arrival that catches a mismatch before the lift, not after.
A field perspective: what actually goes wrong
The two mistakes I see repeated most on spiral jobs are hangers spaced by eye instead of by drawing, and mastic applied over a joint that wasn’t fully seated first. Both are five-minute problems caught early and half-day problems caught at test time. The single best habit: walk every joint with a light before it gets buried, every time, no exceptions.
How Manara Corp supports your spiral duct project
Manara Corp fabricates round and spiral ductwork, fittings, elbows, and reducers in-house at our Lachine shop, and we install locally across Greater Montreal, from the island through Laval, the South Shore, and the West Island. Joints get fit-checked and, where the job calls for it, pre-sealed before anything leaves the shop, so your crew spends less time correcting field-cut sections and more time hanging duct.

If a job needs rush fabrication, custom tapers, or complex fitting geometry that a standard catalogue won’t cover, contact us before you finalize the shop drawing. We work directly with HVAC contractors and general contractors to fit custom pieces into an existing run without slowing down your schedule. Request a quote through our round and spiral duct page or browse the full fittings catalogue to see what’s available for pickup or delivery on your next Montreal-area install.
Sources
- Essentials of duct supports
- Good practices – assembly, transportation and storage of SPIRAL system
- Spiral duct guide — types, specs, selection
- Spiral pipe installation – slip joints and flanges – Spiral Manufacturing
- What is and How To Install Spiral Ducting | Ducting Express
FAQ
How do you attach spiral duct sections together?
Seat the male end into the female end against the factory stop-fold limiter, rotating slightly to settle the gasket, then fasten with self-drilling screws or rivets in a crosswise pattern before applying mastic or tape.
What is the 2 foot rule for ductwork?
The “2 foot rule” refers to a common practice of placing the first support within roughly 2 feet of a fitting, joint, or directional change to prevent unsupported weight from pulling the joint out of alignment; always confirm the exact interval against your shop drawing rather than assuming a universal figure.
What are the different ways to hang spiral duct?
The two common methods are split clips, suited to lighter and smaller-diameter runs, and suspension clips paired with individual hangers on threaded rod, used for larger diameters and heavier duct, with hangers typically spaced around every three metres per common industry practice.
Does spiral duct need to be insulated?
Insulation is required where thermal performance or condensation control matters, such as cold supply air runs in conditioned spaces, but exposed exhaust or unconditioned mechanical room runs may not need it. Check the project’s mechanical spec, since the requirement is project-specific rather than universal.
Can Manara Corp pre-seal fittings before delivery to my site?
Yes. Manara Corp fits and tags critical joints in-shop as part of its round and spiral duct fabrication process, which reduces the amount of field sealing and fitting your crew needs to complete on-site.