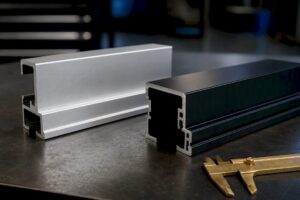
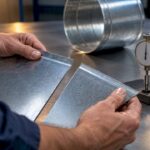
Hemming sheet metal means folding a sheet edge back onto itself to create a reinforced, finished edge that is safer to handle, stiffer, and cleaner-looking than a raw cut. According to PMF, it is used across automotive panels, appliance enclosures, HVAC panels, and architectural metalwork wherever a bare edge would be a hazard or a cosmetic liability. Specify a hem when you need edge stiffness, a smooth tactile surface, or a finished appearance without welding. For purely internal edges or low-visibility structural parts, a deburr or a simple 90° flange is usually faster and cheaper.
Quick equipment orientation:
- Press brake with hemming dies (acute prebend punch and flattening die)
- Swing-beam folder or folding machine for delicate or high-precision work
- Rotary hemmer or robotic hemming cell for curved panels and high-volume runs
- Single-station hemming tool or hydraulic hemming table for long or thick hems
Key takeaways
Hemming sheet metal is worth specifying when edge safety, stiffness, or finish matters, provided the material, flange length, and hem profile are matched correctly before cutting.
| Point | Details |
|---|---|
| Match hem type to alloy | Use closed hems for ductile alloys like 5052; specify teardrop or open hems for 6061-T6 and stainless. |
| Minimum flange length | Design flanges to at least 4× material thickness to give tooling reliable purchase. |
| Two-stage press brake process | Prebend to approximately 30°, then flatten; confirm prebend angle consistency before the flattening pass. |
| Inspect before finishing | Check for cracks at the fold, gap variation, and flatness before any coating or welding. |
| Manaracorp for Greater Montreal | Manaracorp fabricates and installs hemmed sheet metal parts in steel, stainless, aluminium, and copper across Greater Montreal. |
Table of Contents
- Hemming sheet metal: common hem profiles and when to use each
- Step-by-step hemming process: from part prep to final inspection
- Hemming methods and the machines behind them
- Design guidelines for manufacturable hems
- How material type and thickness affect hemming
- Hemming versus other edge finishes: a decision checklist
- Troubleshooting common hemming defects
- How to choose a hemming or fabrication service
- How Manaracorp handles a hemming project
- When hemming is worth specifying and when it is not
- Manaracorp: custom hemming and sheet metal fabrication in Greater Montreal
- Sources
- FAQ
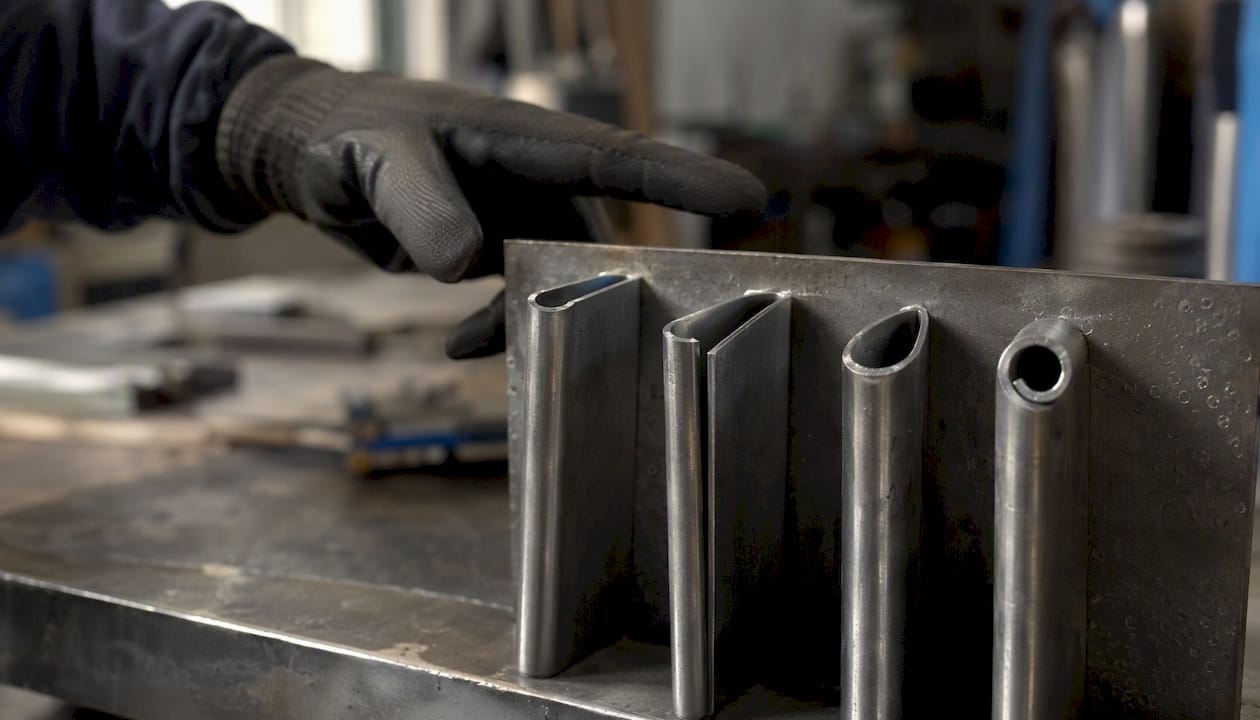
Hemming sheet metal: common hem profiles and when to use each
Four hem profiles cover nearly every production scenario: closed, open, teardrop, and rolled. Choosing the wrong one for your material is the fastest route to cracking or scrapped parts.
Closed hem (flat hem)
The flange folds completely flat against the parent sheet, leaving no gap. This gives the stiffest edge and the cleanest appearance, but it demands a ductile material. Cold-rolled steel (CRS) and 5052 aluminium handle it well. Avoid closed hems on heat-treated alloys like 6061-T6 or on stainless steel above 1.5 mm, where the tight radius causes cracking at the fold.
Applications: appliance door panels, electrical enclosures, HVAC access panels, architectural trim.
Open hem
The flange folds back but stops short of full closure, leaving a controlled gap. The gap reduces the forming force required and gives springy or thicker materials room to move without cracking. Wikipedia’s hemming entry notes that a closed hem requires significantly more forming force than an open hem, so for thick-gauge stainless or 6061-T6, an open hem is often the only practical choice.
Applications: stainless steel enclosures, thicker-gauge steel panels, parts where a wire or rod insert will be captured inside the hem.
Teardrop hem
A small radius is left at the fold rather than crushing it flat or leaving a wide gap. The teardrop profile distributes strain around the bend, which is why design guides recommend it specifically for low-ductility alloys such as 6061-T6. It is the go-to hem when you need a finished edge on a harder aluminium grade without switching to a more forgiving alloy.
Applications: aerospace brackets, automotive structural panels, aluminium extrusion-adjacent parts.
Rolled hem
The edge curls into a full or partial tube rather than folding flat. A rolled hem is the softest edge profile and works well for handles, grip edges, and any part where a person’s hand will contact the metal repeatedly. It requires a dedicated roll-forming die or a rotary hemmer and is not practical on a standard press brake without specialised tooling.
Applications: door handles, sheet metal handles on enclosures, decorative trim.
Pro Tip: If your drawing calls for a closed hem on 6061-T6 or any heat-treated aluminium, change it to a teardrop hem before sending it to the shop. A closed hem on that alloy will crack at the fold almost every time, and no amount of press tonnage fixes a material ductility problem.
Step-by-step hemming process: from part prep to final inspection
A clean hem starts well before the press brake. Skipping preparation steps is the single most common cause of cracking and uneven closure.
1. Deburr and clean the blank
Remove all burrs from laser-cut or sheared edges. A sharp burr concentrates stress at the fold and initiates cracks. Clean the surface of oils, scale, and debris. Contamination under the hem traps corrosive material and causes paint adhesion failures later. Clean laser-cut edges reduce this prep time significantly compared to sheared or plasma-cut blanks.
2. Check flatness and flange length
Lay the blank on a flat surface and confirm it has no bow or twist. A warped blank will produce an uneven hem. Verify the flange length against your flat pattern. The flange must be long enough to give the tooling purchase; the widely cited minimum is approximately four times the material thickness, though tighter designs sometimes push to 3.5× with careful tooling setup.
3. Prebend to an acute angle (Stage 1)
On a press brake, use an acute-angle punch (typically forming to around 30°) to fold the flange. This stage sets the geometry for the final closure. The acute angle must be consistent along the full length of the part; any variation shows up as an uneven gap in the finished hem.
4. Flatten with a hemming die (Stage 2)
Transfer the part to a flattening die and close the hem. The Fabricator’s guide to press brake hemming describes this two-stage workflow as standard practice, with single-station hemming tools available for higher-volume or longer hems where repositioning is impractical. Apply tonnage gradually. Slamming full force on the first stroke risks cracking and die damage.
5. Inspect
- Flatness: lay the hemmed edge on a flat plate. Any rock or gap indicates uneven closure.
- Inside gap: for an open hem, check the gap dimension at three or more points along the length. Variation beyond ±0.3 mm typically indicates inconsistent prebend angle or a worn die.
- Visual crack check: examine the outside radius under good light. Hairline cracks at the fold are a reject condition, not a cosmetic issue.
- Edge alignment: the folded flange should be flush with the parent sheet face on a closed hem. Misalignment points to incorrect flat pattern allowance.
Inspection checklist: deburr complete → blank flat → flange length confirmed → prebend angle consistent → hem closed evenly → no cracks at fold → gap within tolerance → edge flush.
Hemming methods and the machines behind them
The right machine depends on part geometry, material, volume, and finish requirements. No single method wins across all four.
| Method | Best for | Typical volume | Key limitation |
|---|---|---|---|
| Press brake (two-stage) | Straight hems, mixed production, prototypes | Low to medium | Repositioning adds cycle time; marks possible on soft metals |
| Swing-beam folder | Straight hems, delicate finishes, thin gauge | Low to medium | Limited to straight edges; less force than a press brake |
| Rotary hemmer | Curved panels, complex geometry | Medium to high | High tooling cost; not practical for short runs |
| Robotic hemming cell | High-volume automotive panels | High | Very high capital cost; not viable below large production volumes |
| Single-station hemming tool | Long hems, thick material | Low to medium | Requires careful thrust management |
Press brake hemming is a common approach in fabrication shops. It handles straight hems on a variety of materials, though long runs may require repositioning and incur additional cycle time.
Folding machines clamp the sheet and use a rotating beam to fold the edge rather than a punch crushing down onto the material. That clamping action eliminates the tooling-mark risk that press brakes carry on polished or pre-painted surfaces. For architectural panels, pre-painted steel, or any part where surface finish is a selling point, a folder is worth the extra setup time.
Rotary hemming is the standard in automotive body-in-white production. A roller follows a programmed path along a curved flange, progressively closing the hem in multiple passes. The process handles complex three-dimensional geometry that a press brake cannot touch, but the tooling and programming cost makes it impractical for anything below a sustained production run.
For long hems on thick material, thrust management becomes a real concern. A long hem generates significant lateral force that can bow the part or shift it in the die. Thrust-absorbing dies, hemming tables with back-gauges, and staged forming all address this, but they add setup complexity.
Pro tip on tooling marks: if you are hemming pre-painted or brushed stainless steel, a press brake will leave witness marks from the punch unless you use a urethane pad or a dedicated low-mark tooling set. A folder avoids the problem entirely.
Design guidelines for manufacturable hems
Getting the geometry right on paper prevents the most common shop rejections. These rules apply to press brake hemming; folding machines and rotary hemmers follow similar minimums.
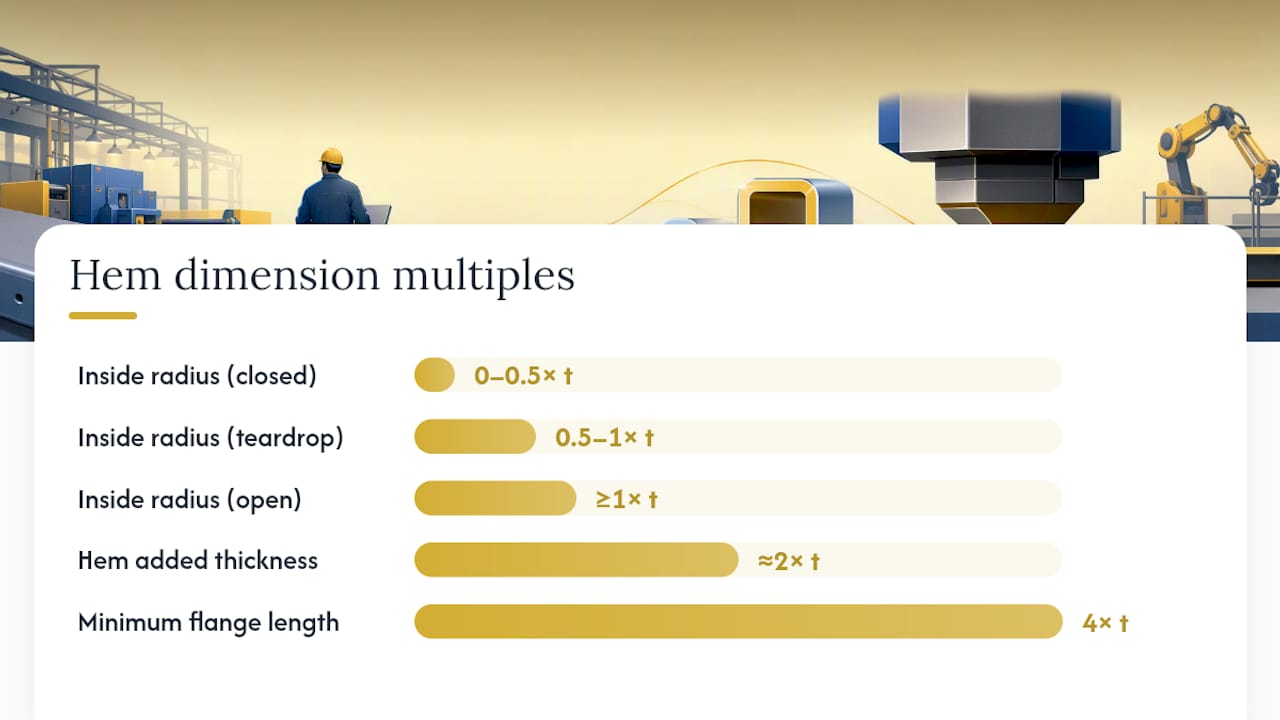
| Parameter | Rule of thumb | Notes |
|---|---|---|
| Minimum flange length | 4× material thickness | Widely cited by fabricators as the minimum for reliable tooling purchase |
| Inside radius (closed hem) | 0× to 0.5× material thickness | Requires high ductility; avoid on 6061-T6 |
| Inside radius (teardrop hem) | 0.5× to 1× material thickness | Distributes strain; suitable for harder alloys |
| Inside radius (open hem) | 1× material thickness or greater | Controlled by shim or mandrel in the die |
| Flat pattern allowance (closed hem) | Approximately 2× flange length minus 0.43× material thickness | Varies by material and tooling; confirm with your shop |
Example flat pattern calculation: a 1.5 mm cold-rolled steel part with a 10 mm closed hem flange. Minimum flange check: 4 × 1.5 mm = 6 mm minimum; 10 mm passes. Flat pattern addition: (2 × 10 mm) minus (0.43 × 1.5 mm) = 20 mm minus 0.645 mm = approximately 19.35 mm added to the blank length for the hem.
A few additional rules worth keeping on your drawing checklist:
- Keep hems away from holes or cutouts by at least 4× material thickness. Forming over a hole distorts the hem and the hole.
- On assemblies, account for the hem’s added thickness (roughly 2× material thickness for a closed hem) in any mating clearance.
- Avoid hemming across a weld seam. The heat-affected zone changes local ductility and the hem will crack or close unevenly at the seam.
- For parts that will be powder-coated after hemming, leave a minimum 0.5 mm gap on an open hem to allow paint penetration and prevent trapped moisture.
Pro Tip: Add the flat pattern allowance to your CAD model before sending for laser cutting. Shops that cut from your finished-part drawing and calculate the allowance themselves will sometimes use a different k-factor than your CAD software assumes, and the hem dimension will be off. Agree on the allowance before cutting.
How material type and thickness affect hemming
Material choice drives hem type, tooling geometry, and required tonnage more than any other variable.
Aluminium grades
5052-H32 is the most hem-friendly aluminium alloy in general fabrication. Its ductility tolerates closed hems at standard thicknesses. 6061-T6 is a different story: its lower elongation at break makes closed hems a cracking risk, so design guides consistently recommend teardrop or open hems for this alloy. If a customer insists on a closed hem in 6061-T6, the practical answer is to anneal the flange area before forming, which adds cost and time.
Cold-rolled steel
CRS handles closed hems well up to about 2 mm. Above that, springback becomes significant and the tonnage required to fully close the hem rises sharply. An open hem with a controlled gap is often the better engineering choice for thicker CRS.
Stainless steel
Stainless work-hardens as it bends. A hem that would close cleanly in CRS at the same thickness will require noticeably more force in 304 stainless, and the springback is greater. Plan for a slightly more acute prebend angle to compensate, and expect higher tooling wear.
Tonnage guidance
Hemming requires higher tonnage than standard bending, and a closed hem requires more force than an open hem of the same material and thickness. As a rough planning figure: a closed hem in 1.5 mm CRS over a 1,000 mm bed length typically demands 40–60 tonnes depending on tooling geometry, while an open hem of the same spec runs closer to 25–35 tonnes. Always confirm with your press brake manufacturer’s tonnage chart for the specific die set.
- For hems longer than 1,500 mm, consider a hydraulic hemming table or a dedicated hemming press to manage thrust and bowing.
- Use shims or mandrels inside an open hem die to control the gap dimension repeatably across a production run.
- For stainless above 2 mm, stage the prebend in two passes rather than one to reduce springback and tooling stress.
Pro Tip: When hemming pre-painted or coated material, switch to a folding machine if you have access to one. Folding machines clamp and rotate rather than punch, which means the coating on the visible face never contacts the tooling directly. The result is a finished hem with no witness marks to touch up.
Hemming versus other edge finishes: a decision checklist
A hem is not always the right answer. Run through this checklist before specifying one.
Choose hemming when:
- The edge will be handled repeatedly by people (safety is the primary driver)
- The part needs edge stiffness without adding a separate reinforcement
- Appearance matters and a raw or deburred edge is not acceptable
- The design calls for a captured wire, rod, or insert at the edge
- HVAC panels, appliance doors, or architectural trim where finish is part of the product
Consider a simpler finish when:
- The edge is internal, hidden, or structural only: a deburr or a 90° safety flange costs less and adds no forming time
- Volume is very low (one or two parts): a hand file and a deburr tool may be faster than setting up a hemming die
- Material is too thick or too brittle for any hem profile: a rolled edge or a welded flange is a better structural solution
- Post-hem welding is planned along the hem edge: welding over a closed hem traps gas and creates porosity; leave the edge open or use a flanged seam instead
Post-hem finishing notes:
Hemmed parts accept powder coating and wet paint without special preparation, provided the hem is fully closed with no sharp protrusions. For welding after hemming, keep the weld away from the hem fold itself; heat at the fold can crack a tight closed hem in aluminium. Primer penetration into an open hem gap requires a minimum gap of 0.5 mm; tighter than that and the gap traps moisture under the coating.
For a broader look at how hemming fits within a full sheet bending and rolling workflow, the forming sequence matters: cut, deburr, hem, then any secondary bends, then finish.
Troubleshooting common hemming defects
Most hemming problems trace back to one of four causes: wrong material for the hem type, incorrect flat pattern, tooling wear, or inconsistent forming pressure.
1. Cracking at the fold
Likely cause: material ductility too low for the hem profile, or inside radius too tight.
Fix: switch to a teardrop or open hem; anneal the flange area if the alloy permits; increase the inside radius. If the crack appears only at the ends of the hem, the blank may be over-constrained at the edges during flattening.
2. Springback and incomplete closure
Likely cause: insufficient tonnage, worn flattening die, or excessive springback in stainless or heat-treated alloys.
Fix: increase tonnage in small increments; overbend the prebend angle slightly (e.g., form to 25° instead of 30°) to compensate for springback; replace worn tooling. For stainless, a two-pass prebend reduces the springback load on the flattening stage.
3. Wrinkling or buckling along the hem
Likely cause: flange length too long relative to thickness, or uneven blank flatness.
Fix: shorten the flange if the design allows; check blank flatness before forming; use a back-gauge to hold the part consistently during the prebend. Large-panel hemming is particularly prone to bowing and uneven closure; a hemming table with distributed clamping addresses this better than a standard press brake setup.
4. Uneven gap on an open hem
Likely cause: inconsistent prebend angle, worn or misaligned die, or no shim/mandrel to control gap.
Fix: check die alignment; add a shim or mandrel to set the gap positively; verify prebend angle at multiple points along the length before flattening.
5. Tooling marks on the visible face
Likely cause: punch radius too sharp, or forming pre-painted/polished material on a press brake.
Fix: use a larger punch nose radius; add a urethane pad between punch and material; switch to a folding machine for cosmetically critical parts.
Inspection pass/fail criteria:
- No visible cracks at the fold (zero tolerance)
- Gap variation on open hem: ±0.3 mm or per drawing tolerance
- Hem flatness: no rock greater than 0.5 mm over 300 mm length
- Edge alignment on closed hem: flush within 0.2 mm
Pro Tip: Before scrapping a cracked part, check whether the crack is at the very end of the hem. End cracking often means the blank is slightly too wide for the die, causing the material to bind at the edges during flattening. Trimming 0.5–1 mm from each end of the blank sometimes eliminates the problem without changing the hem design.
How to choose a hemming or fabrication service
Outsourcing hemming means trusting a shop with your flat pattern calculations, your tooling setup, and your quality standard. Ask the right questions before you commit.
Questions to ask any shop:
- What hemming methods do you have in-house: press brake only, or also folding machines and rotary hemmers?
- What is your maximum bed length and available tonnage for hemming?
- Which materials have you hemmed in production quantities: CRS, 5052, 6061, stainless?
- Can you provide DFM feedback on my flat pattern and hem allowances before cutting?
- What is your inspection process for hemmed parts, and what are your pass/fail criteria?
- Can I see a sample hem in my material and thickness before committing to a production run?
- Do you have in-house tooling for the hem profile I need, or will you need to order it?
Red flags:
- No DFM feedback offered: a shop that will cut and form whatever you send without reviewing the flat pattern is likely to produce scrap on your first run.
- Refusal to show sample work or run a prototype: any competent shop will run a sample on a new hem profile before committing to production.
- No in-house hemming tooling: outsourcing the tooling means longer lead times and less control over quality.
- Vague answers on tonnage or bed length: these are basic shop parameters; if a shop cannot answer them, their capacity is uncertain.
Practical guidance:
For small batches (under 20 parts), request a prototype run and a process plan showing the flat pattern allowance used. For production runs, ask for a first-article inspection report before the full run proceeds. Always confirm that the shop’s flat pattern allowance matches your CAD model’s assumption, or agree on a single value before cutting.
How Manaracorp handles a hemming project
The workflow below reflects how a professional fabrication shop coordinates a hemming job from quote to delivery. Clients should confirm specific capacities directly with the shop for their project.
Shop workflow:
- Quoting and DFM review: the shop reviews the drawing for hem type, flange length, material, and flat pattern allowance. Any DFM issues (flange too short, wrong hem for the alloy, holes too close to the fold) are flagged before cutting.
- In-house laser cutting: blanks are cut to the confirmed flat pattern. Clean laser-cut edges reduce deburring time and give consistent edge geometry going into the hem.
- Hemming setup: the correct punch and die set is selected for the hem profile and material. Prebend angle and tonnage are dialled in on a test piece before production parts are formed.
- QA and inspection: hemmed parts are checked for flatness, gap consistency, crack-free folds, and edge alignment against the drawing tolerance.
- Finishing: post-hem operations such as welding, grinding, or coating are completed in-house or coordinated with the finishing step.
Capabilities a shop should confirm for your project:
- Maximum press tonnage and bed length available for hemming
- Available hemming die profiles (closed, open, teardrop)
- Material experience (aluminium grades, stainless, CRS)
- Whether a folding machine is available for delicate or pre-finished material
Manaracorp operates out of Lachine, Quebec, and serves Greater Montreal for custom sheet bending and rolling including hemming work in steel, stainless steel, aluminium, and copper. Clients should contact the shop directly to confirm current capacity, available die sets, and lead times for their specific project.
Pro Tip: Send your shop a dimensioned cross-section sketch of the hem profile you want, not just a note on the drawing. A sketch showing the hem type, inside radius, gap dimension (for open hems), and flange length eliminates ambiguity and gets you an accurate quote faster.
When hemming is worth specifying and when it is not
Hemming earns its cost when the edge does real work: it stiffens a panel that would otherwise flex, protects a person’s hand from a sharp cut edge, or gives a product a finished appearance that a raw cut cannot. For HVAC panels, appliance doors, and architectural metalwork, the hem is often load-bearing in the sense that the product’s perceived quality depends on it.
Where hemming is not worth the setup cost is on internal structural parts, hidden flanges, or single-piece prototypes where the edge will never be seen or touched. A deburr takes thirty seconds; a hemming setup takes thirty minutes. On a one-off part, that math rarely works in the hem’s favour.
Three checks before you specify a hem:
- Material: confirm your alloy tolerates the hem profile you are drawing. If it is 6061-T6, draw a teardrop, not a closed hem.
- Flange length: verify the flange is at least 4× material thickness. Shorter than that and the tooling will slip or the hem will close unevenly.
- Volume: if the run is under ten parts, ask whether a simple edge treatment achieves the same functional goal at lower cost.
For readers who decide to outsource, Manaracorp’s bending and rolling services cover hemming work in Greater Montreal.
Manaracorp: custom hemming and sheet metal fabrication in Greater Montreal
Manaracorp is a custom metal fabrication shop in Lachine, Quebec, with in-house CNC laser cutting, sheet bending and rolling, and welding for steel, stainless steel, aluminium, and copper. For a project that needs hemmed panels, ductwork edges, or architectural metalwork with a finished hem profile, the full workflow from flat blank to finished part happens under one roof.
The practical difference for a contractor or designer working in Greater Montreal: no coordination between a cutting shop and a separate forming shop, no flat pattern disagreements between vendors, and DFM feedback before the first blank is cut. Manaracorp serves the island of Montreal, Laval, the South Shore, and the West Island for projects of any size.
Get a quote for your hemming or sheet bending project by contacting Manaracorp directly. If your project includes post-hem welding or assembly, that is handled in-house as well.
Sources
- Sheet Metal Hemming: What It Is, Hem Types, and Fabrication Uses | PMF
- Hemming and seaming
- Sheet metal hemming strategies on the press brake
- Sheet Metal Hem Design Guide: Teardrop & Closed Hems
- When to buy a press brake vs a sheet metal folder
FAQ
What is hemming in sheet metal fabrication?
Hemming folds a sheet metal edge back onto itself to create a reinforced, finished edge that is safer to handle and stiffer than a raw cut. It is used in automotive panels, appliance enclosures, HVAC panels, and architectural metalwork.
How do you hem the edge of sheet metal on a press brake?
The standard two-stage process prebends the flange to approximately 30° using an acute punch, then closes it with a flattening die. Consistent prebend angle along the full length is critical before the flattening pass.
What is the best way to bend sheet metal for a clean hem?
For cosmetically critical or pre-painted material, a folding machine produces cleaner results than a press brake because it clamps and rotates rather than punching down onto the surface, eliminating tooling marks on the visible face.
How do you finish sheet metal edges without hemming?
Deburring removes sharp edges quickly for internal or hidden parts. A 90° safety flange adds stiffness without the forming complexity of a hem. Rolled edges work well for handles and grip surfaces. Welded flanges suit thick or structural edges where a hem would crack.
What hem profile should I use for 6061-T6 aluminium?
Specify a teardrop or open hem for 6061-T6. Its lower ductility makes closed hems a cracking risk at the fold. A teardrop profile distributes the forming strain around a small inside radius rather than crushing the material flat.